Copyright (c) 2017 Koren Lev (Cisco Systems), Yaron Yogev (Cisco Systems) and others All rights reserved. This program and the accompanying materials are made available under the terms of the Apache License, Version 2.0 which accompanies this distribution, and is available at http://www.apache.org/licenses/LICENSE-2.0

Project “Calipso” tries to illuminate complex virtual networking with real time operational state visibility for large and highly distributed Virtual Infrastructure Management (VIM).
Calipso provides visible insights using smart discovery and virtual topological representation in graphs, with monitoring per object in the graph inventory to reduce error vectors and troubleshooting, maintenance cycles for VIM operators and administrators.
Calipso model, described in this document, was built for multi-environment and many VIM variances, the model was tested successfully (as of Aug 27th) against 60 different VIM variances (Distributions, Versions, Networking Drivers and Types).
Table of Contents
Calipso.io Administration Guide 1
1 Environments config 3
2 UI overview 5
2.1 User management 7
2.2 Logging in and out 8
2.3 Messaging check 9
2.4 Adding a new environment 9
3 Preparing an environment for scanning 10
3.1 Where to deploy Calipso application 10
3.2 Environment setup 10
3.3 Filling the environment config data 11
3.4 Testing the connections 11
4 Links and Cliques 12
4.1 Adding environment clique_types 13
5 Environment scanning 14
5.1 UI scanning request 14
5.2 UI scan schedule request 16
5.3 API scanning request 17
5.4 CLI scanning in the calipso-scan container 18
5.4.1 Clique Scanning 19
5.4.2 Viewing results 20
6 Editing or deleting environments 20
7 Event-based scanning 21
7.1 Enabling event-based scanning 21
7.2 Event-based handling details 22
8 ACI scanning 34
9 Monitoring enablement 36
10 Modules data flows 38
Environments config
Environment is defined as a certain type of Virtual Infrastructure facility the runs under a single unified Management (like an OpenStack facility).
Everything in Calipso application rely on environments config, this is maintained in the “environments_config” collection in the mongo Calipso DB.
Environment configs are pushed down to Calipso DB either through UI or API (and only in OPNFV case Calipso provides an automated program to build all needed environments_config parameters for an ‘Apex’ distribution automatically).
When scanning and discovering items Calipso uses this configuration document for successful scanning results, here is an example of an environment config document:
**{ **
**”name”: “DEMO-ENVIRONMENT-SCHEME”, **
**”enable_monitoring”: true, **
**”last_scanned”: “filled-by-scanning”, **
**”app_path”: “/home/scan/calipso_prod/app”, **
**”type”: “environment”, **
**”distribution”: “Mirantis”, **
**”distribution_version”: “8.0”, **
**”mechanism_drivers”: [“OVS”], **
“type_drivers”: “vxlan”
**”operational”: “stopped”, **
**”listen”: true, **
**”scanned”: false, **
“configuration”: [
{
**”name”: “OpenStack”, **
**”port”:”5000”, **
**”user”: “adminuser”, **
**”pwd”: “dummy_pwd”, **
**”host”: “10.0.0.1”, **
“admin_token”: “dummy_token”
**}, **
{
**”name”: “mysql”, **
**”pwd”: “dummy_pwd”, **
**”host”: “10.0.0.1”, **
**”port”: “3307”, **
“user”: “mysqluser”
**}, **
{
**”name”: “CLI”, **
**”user”: “sshuser”, **
**”host”: “10.0.0.1”, **
“pwd”: “dummy_pwd”
**}, **
{
**”name”: “AMQP”, **
**”pwd”: “dummy_pwd”, **
**”host”: “10.0.0.1”, **
**”port”: “5673”, **
“user”: “rabbitmquser”
**}, **
{
**”name”: “Monitoring”, **
**”ssh_user”: “root”, **
**”server_ip”: “10.0.0.1”, **
**”ssh_password”: “dummy_pwd”, **
**”rabbitmq_pass”: “dummy_pwd”, **
**”rabbitmq_user”: “sensu”, **
**”rabbitmq_port”: “5671”, **
**”provision”: “None”, **
**”env_type”: “production”, **
**”ssh_port”: “20022”, **
**”config_folder”: “/local_dir/sensu_config”, **
**”server_name”: “sensu_server”, **
**”type”: “Sensu”, **
“api_port”: NumberInt(4567)
**}, **
{
**”name”: “ACI”, **
**”user”: “admin”, **
**”host”: “10.1.1.104”, **
“pwd”: “dummy_pwd”
}
**], **
**”user”: “wNLeBJxNDyw8G7Ssg”, **
“auth”: {
“view-env”: [
“wNLeBJxNDyw8G7Ssg”
**], **
“edit-env”: [
“wNLeBJxNDyw8G7Ssg”
]
**}, **
}
Here is a brief explanation of the purpose of major keys in this environment configuration doc:
Distribution: captures type of VIM, used for scanning of objects, links and cliques.
Distribution_version: captures version of VIM distribution, used for scanning of objects, links and cliques.
Mechanism_driver: captures virtual switch type used by the VIM, used for scanning of objects, links and cliques.
Type_driver: captures virtual switch tunneling type used by the switch, used for scanning of objects, links and cliques.
Listen: defines whether or not to use Calipso listener against the VIM BUS for updating inventory in real-time from VIM events.
Scanned: defines whether or not Calipso ran a full and a successful scan against this environment.
Last_scanned: end time of last scan.
Operational: defines whether or not VIM environment endpoints are up and running.
Enable_monitoring: defines whether or not Calipso should deploy monitoring of the inventory objects running inside all environment hosts.
Configuration-OpenStack: defines credentials for OpenStack API endpoints access.
Configuration-mysql: defines credentials for OpenStack DB access.
Configuration-CLI: defines credentials for servers CLI access.
Configuration-AMQP: defines credentials for OpenStack BUS access.
Configuration-Monitoring: defines credentials and setup for Calipso sensu server (see monitoring-guide for details).
Configuration-ACI: defines credentials for ACI switched management API, if exists.
User and auth: used for UI authorizations to view and edit this environment.
App-path: defines the root directory of the scanning application.
* This guide will help you understand how-to add new environment through the provided Calispo UI module and then how-to use this environment (and potentially many others) for scanning and real-time inventories collection.
UI overview
Cloud administrator can use the Calipso UI for he’s daily tasks. Once Calipso containers are running (see quickstart-guide) the UI will be available at:
http://server-ip:80 , default login credentials: admin/123456.
Before logging in, while at the main landing page, a generic information is provided.
Post login, at the main dashboard you can click on “Get started” and view a short guide for using some of the basic UI functions, available at: server-ip/getstarted.
The main areas of interest are shown in the following screenshot:
Main areas on UI:
Main areas details:
Navigation Tree(1): Hierarchy searching through the inventory using objects and parents details, to lookup a focal point of interest for graphing or data gathering.
Main functions (2): Jumping between highest level dashboard (all environments), specific environment and some generic help is provided in this area.
Environment Summary (3): The central area where the data is exposed, either through graph or through widget-attribute-listing.
Search engine (4): Finding interesting focal points faster through basic object naming lookups, then clicking on results to get transferred directly to that specific object dashboard. Searches are conducted across all environments.
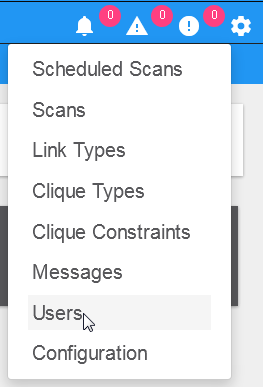
More settings (5): In this area the main collections of data are exposed, like scans, schedules, messaging, clique_types, link_types and others.
Graph or Data toggle (6): When focusing on a certain focal point, this button allows changing from a graph-view to simple data-view per request, if no graph is available for a certain object the data-view is used by default, if information is missing try this button first to make sure the correct view is chosen.

User management
The first place an administrator might use is the user’s configurations, this is where a basic RBAC is provided for authorizing access to the UI functions. Use the ‘settings’ button and choose ‘users’ to access:
Editing the admin user password is allowed here:

Note:
The ‘admin’ user is allowed all functions on all environments, you shouldn’t change this behavior and you should never delete this user, or you’ll need re-install Calipso.
Adding new user is provided when clicking the “Create new user” option:
Creating a new user:
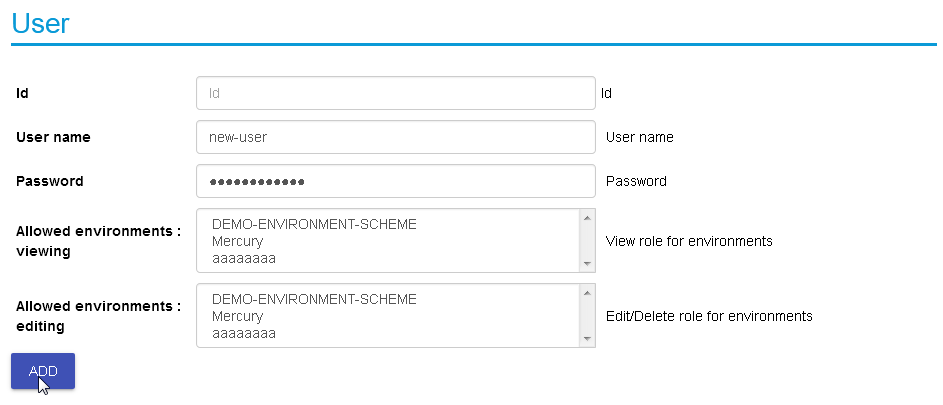
Before environments are configured there is not a lot of options here, once environments are defined (one or more), users can be allowed to edit or view-only those environments.Logging in and out
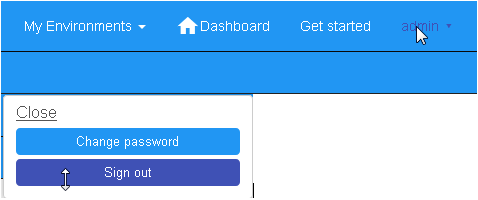
To logout and re-login with different user credentials you can click the username option and choose to sign out:
Messaging check
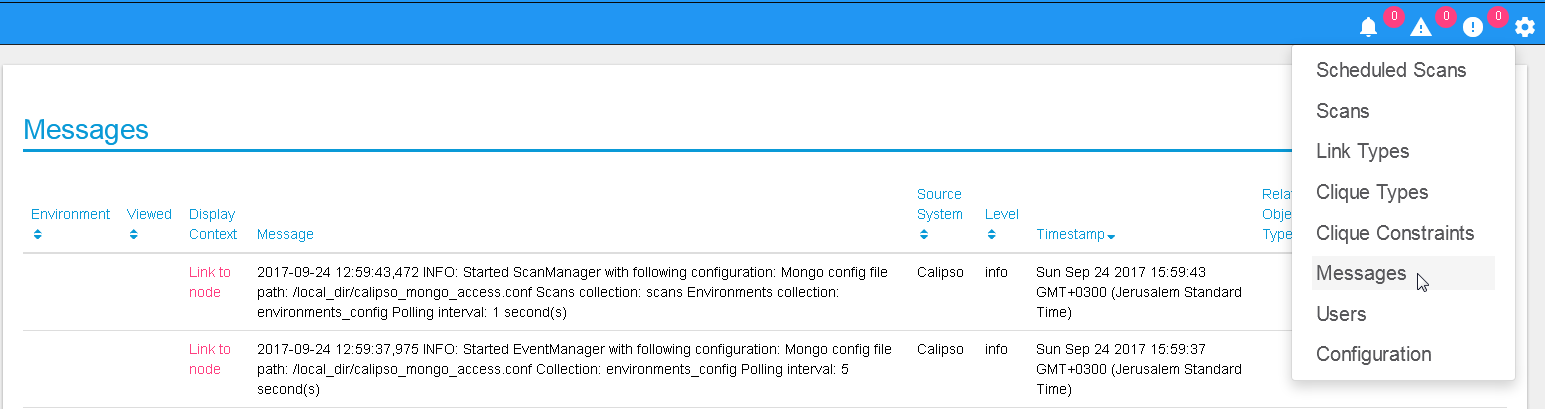
When calispo-scan and calipso-listen containers are running, they provide basic messages on their processes status, this should be exposed thorough the messaging system up to the UI, to validate this choose ‘messages’ from the settings button:
Adding a new environment
As explained above, environment configuration is the pre requisite for any Calipso data gathering, goto “My Environments” -> and “Add new Environment” to start building the environment configuration scheme:

Note: this is automated with OPNFV apex distro, where Calipso auto-discovers all credentials
Preparing an environment for scanning
Some preparation is needed for allowing Calipso to successfully gather data from the underlying systems running in the virtual infrastructure environment. This chapter explain the basic requirements and provide recommendations.
Where to deploy Calipso application
Calipso application replaces the manual discovery steps typically done by the administrator on every maintenance and troubleshooting cycles, It needs to have the administrators privileges and is most accurate when placed on one of the controllers or a“jump server” deployed as part of the cloud virtual infrastructure, Calipso calls this server a “Master host”.
Consider Calipso as yet another cloud infrastructure module, similar to neutron, nova.
Per supported distributions we recommend installing the Calipso application at:
- Mirantis: on the ‘Fuel’ or ‘MCP’ server.
- RDO/Packstack: where the ansible playbooks are deployed.
- Canonical/Ubuntu: on the juju server.
- Triple-O/Apex: on the jump host server.
Environment setup
The following steps should be taken to enable Calispo’s scanner and listener to connect to the environment controllers and compute hosts:
OpenStack API endpoints : Remote access user accessible from the master host with the required credentials and allows typical ports: 5000, 35357, 8777, 8773, 8774, 8775, 9696
OpenStack DB (MariaDB or MySQL): Remote access user accessible from the master host to ports 3306 or 3307 allowed access to all Databases as read-only.
Master host SSH access: Remote access user with sudo privileges accessible from the master host through either user/pass or rsa keys, the master host itself should then be allowed access using rsa-keys (password-less) to all other infrastructure hosts, all allowing to run sudo CLI commands over tty, when commands entered from the master host source itself.
AMQP message BUS (like Rabbitmq): allowed remote access from the master host to listen for all events generated using a guest account with a password.
Physical switch controller (like ACI): admin user/pass accessed from master host.
Note: The current lack of operational toolsets like Calipso forces the use of the above scanning methods, the purpose of Calipso is to deploy its scanning engine as an agent on all environment hosts, in such scenario the requirements above might be deprecated and the scanning itself can be made more efficient.
Filling the environment config data
As explained in chapter 1 above, environment configuration is the pre requisite and all data required is modeled as described. See api-guide for details on submitting those details through calispo api module. When using the UI module, follow the sections tabs and fill the needed data per help messages and the explanations in chapter 1.
Only the AMQP, Monitoring and ACI sections in environment_config documents are optional, per the requirements detailed below on this guide.
Testing the connections
Before submitting the environment_config document it is wise to test the connections. Each section tab in the environment configuration has an optional butting for testing the connection tagged “test connection”. When this button is clicked, a check is made to make sure all needed data is entered correctly, then a request is sent down to mongoDB to the “connection_tests” collection. Then the calispo scanning module will make the required test and will push back a response message alerting whether or not this connection is possible with the provided details and credentials.
Test connection per configuration section:
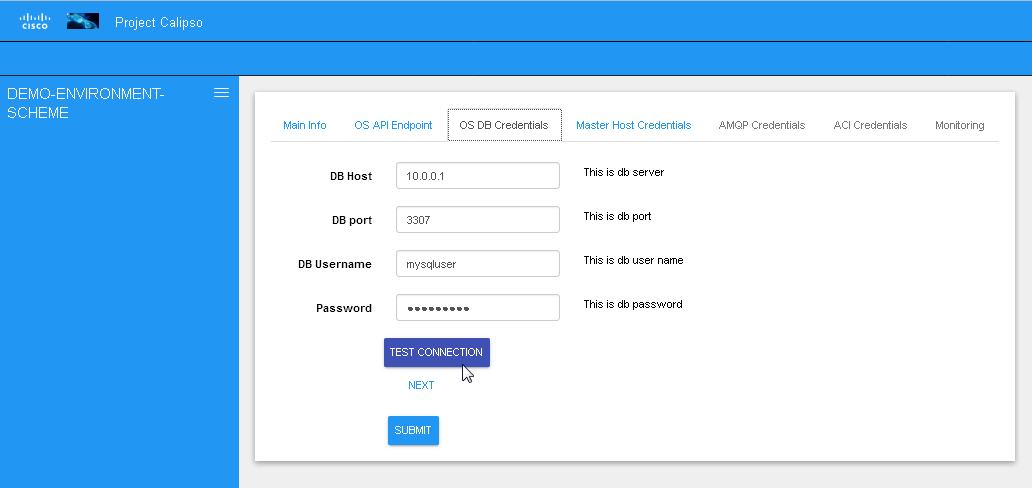
With the above tool, the administrator can be assured that Calipso scanning will be successful and the results will be an accurate representation of the state of he’s live environment.
Links and Cliques
A very powerful capability in Calipso allows it to be very adaptive and support many variances of VIM environments, this capability lies in its objects, links and cliques models enabling the scanning of data and analysis of inter-connections and creation of many types of topology graphs..
Please refer to calipso-model document for more details.
The UI allows viewing and editing of Link types and Clique types through the settings options:
Link types:
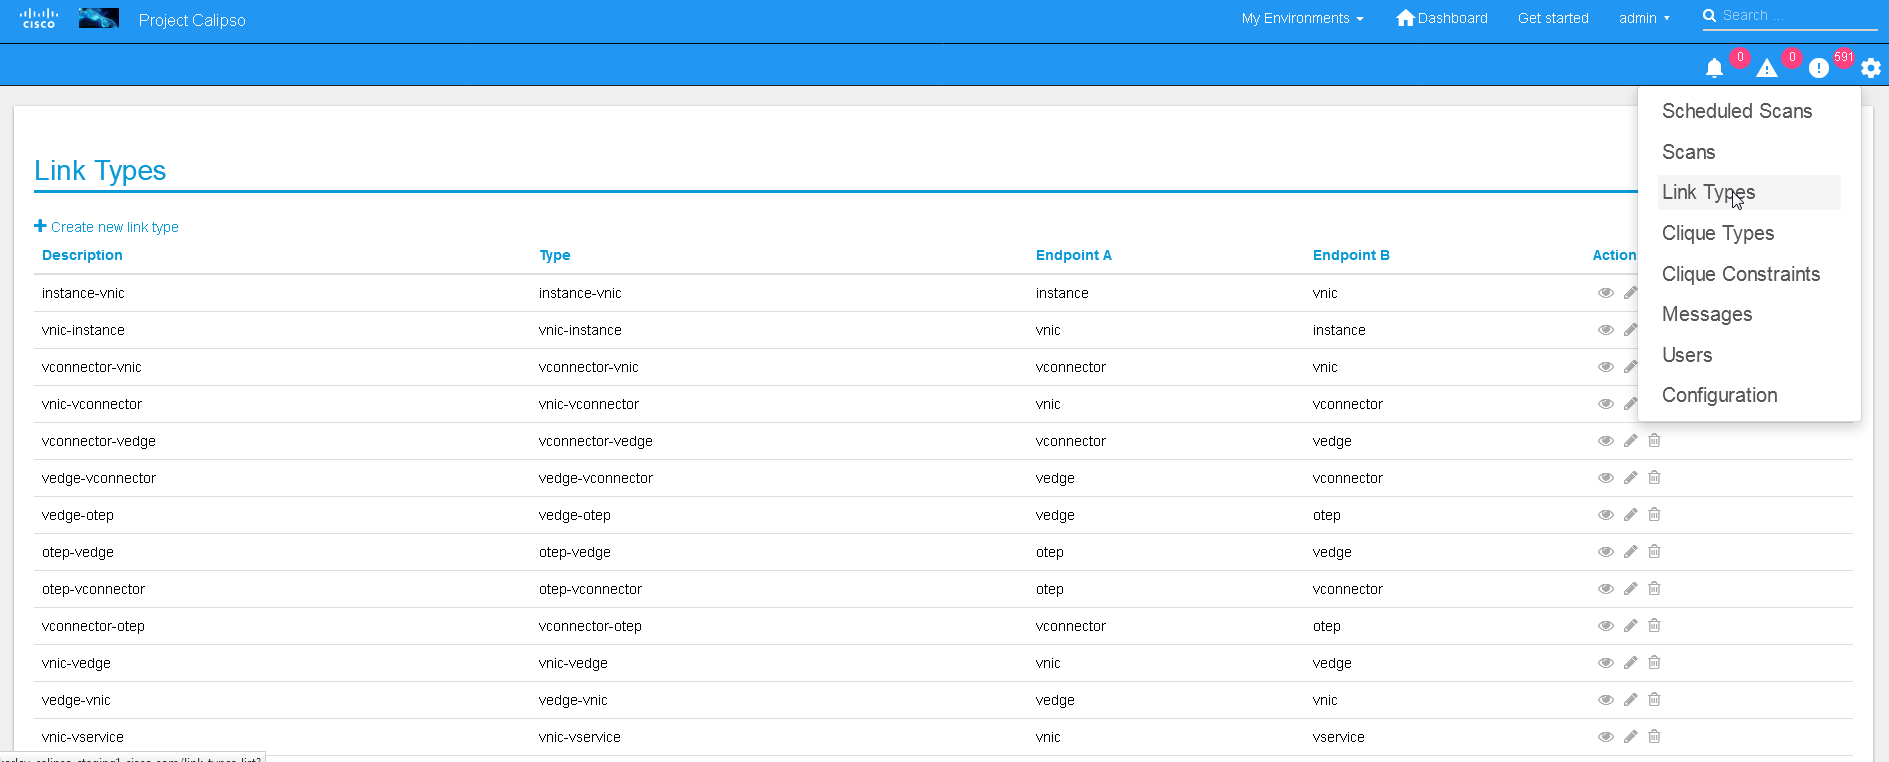
Note:
We currently recommend not to add nor edit the Link types pre-built in Calipso’s latest release (allowed only for the ‘admin’ user), as it is tested and proven to support more than 60 popular VIM variances.
An administrator might choose to define several environment specific Clique types for creating favorite graphs using the focal_point objects and link_types lists already built-in:
Adding environment clique_types
Use either the API or the UI to define specific environment clique_types.
For adding clique_types, use settings menu and choose “Create new clique type” option, then provide a specific environment name (per previous environment configurations), define a focal_point (like: instance, or other object types) and a list of resulted link_types to include in the final topology graph. Refer to calipso-model document for more details.
Clique_types are needed for accurate graph buildup, before sending a scan request.
Several defaults are provided with each new Calipso release.
Clique types:
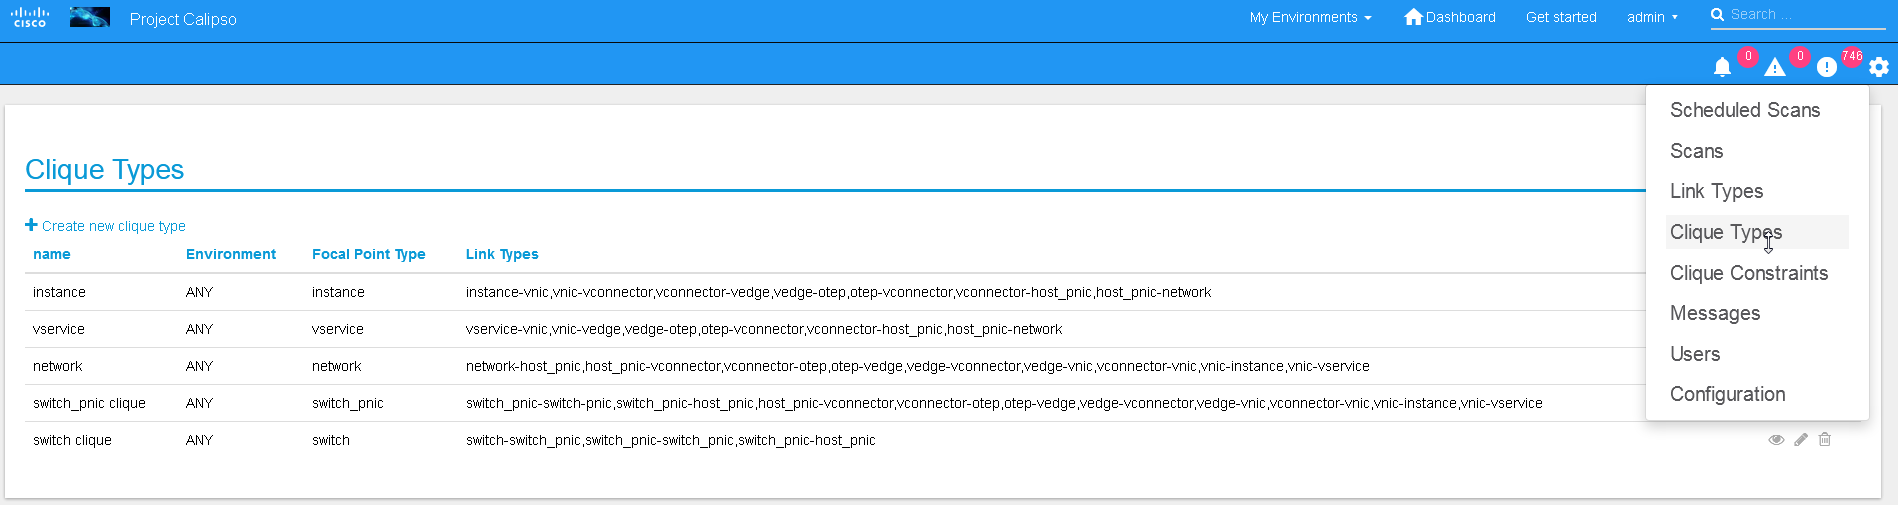
Note: ask calipso developers for recommended clique_types (pre-built in several Calipso deployments), per distribution variance, fully tested by Calipso developers:
Environment scanning
Once environment is setup correctly, environment_config data is filled and tested, scanning can start. This is can be done with the following four options:
UI scanning request
UI scan schedule request
API scanning or scheduling request.
CLI scanning in the calipso-scan container.
The following sections with describe those scanning options.
UI scanning request
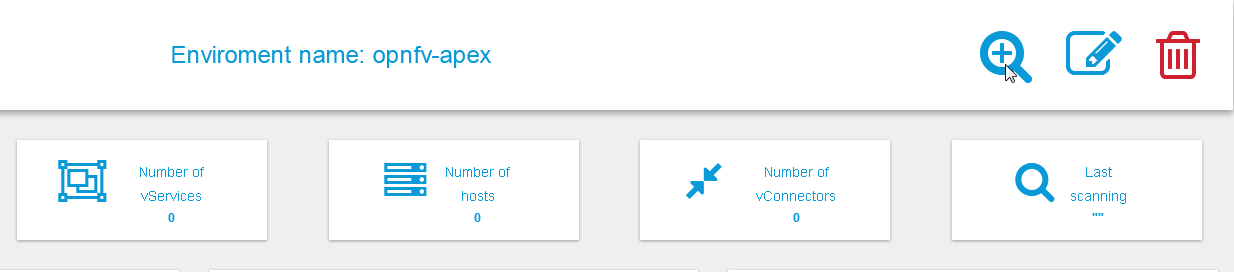
This can be accomplished after environment configuration has been submitted, the environment name will be listed under “My environment” and the administrator can choose it from the list and login to the specific environment dashboard:

Onces inside a specific environment dashboard the administrator can click the scanning button the go into scanning request wizards:
In most cases, the only step needed to send a scanning request is to use all default options and click the “Submit” button:
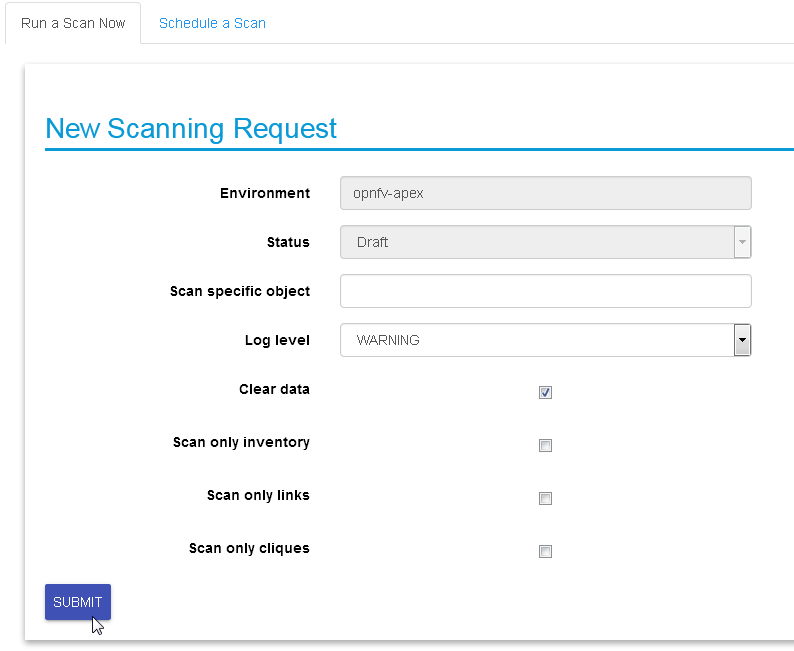
Scanning request will propagate into the “scans” collection and will be handled by scan_manager in the calipso-scan container.
Scan options:
Log level: determines the level and details of the scanning logs.
Clear data: empty historical inventories related to that specific environment, before scanning.
Only inventory: creates inventory objects without analyzing for links.
Only links: create links from pre-existing inventory, does not build graph topologies.
Only Cliques: create graph topologies from pre-existing inventory and links.
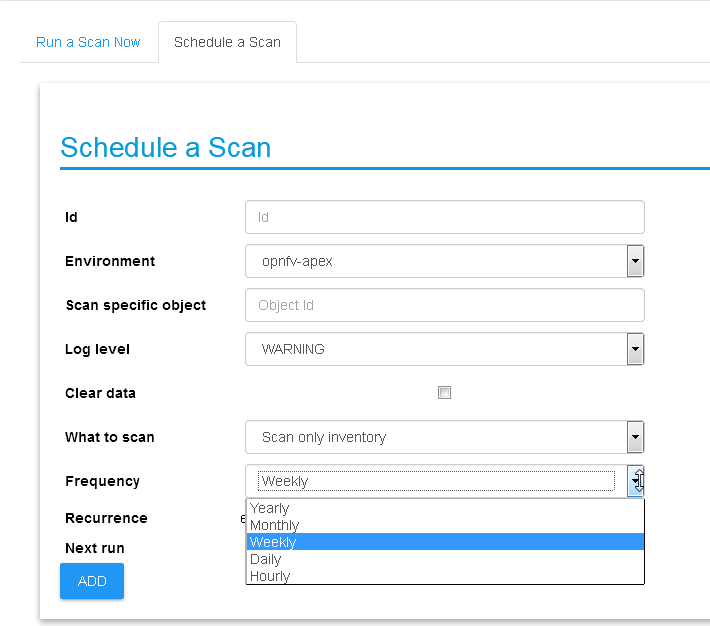
UI scan schedule request
Scanning can be used periodically to dynamically update the inventories per changes in the underlying virtual environment infrastructure. This can be defined using scan scheduling and can be combined with the above one time scanning request.
Scheduled scans has the same options as in single scan request, while choosing a specific environment to schedule on and providing frequency details, timer is counted from the submission time, scan scheduling requests are propagated to the “scheduled_scans” collection in the Calispo mongoDB and handled by scan_manager in the calispo-scan container.
API scanning request
Follow api-guide for details on submitting scanning request through Calipso API.
CLI scanning in the calipso-scan container
When using the UI for scanning messages are populated in the “Messages” menu item and includes several details for successful scanning and some alerts. When more detailed debugging of the scanning process is needed, administrator can login directly to the calispo-scan container and run the scanning manually using CLI:
Login to calispo-scan container running on the installed host:
ssh scan@localhost –p 3002 , using default-password: ‘scan’
Move to the calipso scan application location:
cd /home/scan/calipso_prod/app/discover
Run the scan.py application with the basic default options:
python3 ./scan.py -m /local_dir/calipso_mongo_access.conf -e Mirantis-8
Default options: -m points to the default location of mongoDB access details, -e points to the specific environment name, as submitted to mongoDB through UI or API.
Other optional scanning parameters, can be used for detailed debugging:
The scan.py script is located in directory app/discover in the Calipso repository.To show the help information, run scan.py with –help option, here is the results:
Usage: scan.py [-h] [-c [CGI]] [-m [MONGO_CONFIG]] [-e [ENV]] [-t [TYPE]]
[-y [INVENTORY]] [-s] [-i [ID]] [-p [PARENT_ID]]
[-a [PARENT_TYPE]] [-f [ID_FIELD]] [-l [LOGLEVEL]]
[–inventory_only] [–links_only] [–cliques_only] [–clear]
Optional arguments:
-h, –help show this help message and exit
-c [CGI], –cgi [CGI]
read argument from CGI (true/false) (default: false)
-m [MONGO_CONFIG], –mongo_config [MONGO_CONFIG]
name of config file with MongoDB server access details
-e [ENV], –env [ENV]
name of environment to scan (default: WebEX-
-t [TYPE], –type [TYPE]
type of object to scan (default: environment)
-y [INVENTORY], –inventory [INVENTORY]
name of inventory collection (default: ‘inventory’)
-s, –scan_self scan changes to a specific object (default: False)
-i [ID], –id [ID] ID of object to scan (when scan_self=true)
-p [PARENT_ID], –parent_id [PARENT_ID]
ID of parent object (when scan_self=true)
-a [PARENT_TYPE], –parent_type [PARENT_TYPE]
type of parent object (when scan_self=true)
-f [ID_FIELD], –id_field [ID_FIELD]
name of ID field (when scan_self=true) (default: ‘id’,
use ‘name’ for projects)
-l [LOGLEVEL], –loglevel [LOGLEVEL]
logging level (default: ‘INFO’)
–inventory_only do only scan to inventory (default: False)
–links_only do only links creation (default: False)
–cliques_only do only cliques creation (default: False)
–clear clear all data prior to scanning (default: False)
A simple scan.py run will look, by default, for a local MongoDB server. Assuming running this from within the scan container running, the administrator needs to point it to use the specific MongoDB server. This is done using the Mongo access config file created by the installer (see install-guide for details):
./scan.py -m your\_mongo\_access.conf
Environment needs to be specified explicitly, no default environment is used by scanner.
By default, the inventory collection, named ‘inventory’, along with the accompanying collections: ”links”, “cliques”, “clique_types” and “clique_constraints” are used to place initial scanning data results.
As a more granular scan example, for debugging purposes, using environment “RDO-packstack-Mitaka”, pointing scanning results to an inventory collection named “RDO”:The accompanying collections will be automatically created and renamed accordingly:“RDO_links”, “RDO_cliques”, “RDO_clique_types” and “RDO_clique_constraints”.Another parameter in use here is –clear, which is good for development: it clears all the previous data from the data collections (inventory, links & cliques).
scan.py -m your_mongo_access.conf -e RDO-packstack-Mitaka -y RDO –clear
Log level will provide the necessary details for cases of scan debugging.
Clique Scanning
For creating cliques based on the discovered objects and links, clique_types must be defined for the given environment (or a default “ANY” environment clique_types will be used)A clique type specifies the link types used in building a clique (graph topology) for a specific focal point object type.For example, it can define that for instance objects we want to have the following link types:
instance-vnic
vnic-vconnector
vconnector-vedge
vedge-host_pnic
host_pnic-network
See calipso-model guide for more details on cliques and links.
As in many cases the same clique types are used, we can simply copy the clique_types documents from an existing clique_types collection. For example, using MongoChef:
Click the existing clique types collection
Right click the results area
Choose export
Click ‘next’ all the time (JSON format, to clipboard)
Select JSON format and “Overwrite document with the same _id”
Right click the target collection
Choose import, then JSON and clipboard
- Note that the name of the target collection should have the prefix
name of your collection’s name. For example, you create a collection named your_test, then your clique types collection’s name must be your_test_clique_types.
Now run scan.py again to have it create cliques-only from that data.
Viewing results
Scan results are written into the collections in the ‘Calispo’ DB on the MongoDB database.
In our example, we use the MongoDB database server on “install-hostname”http://korlev-osdna-devtest.cisco.com/, so we can connect to it by Mongo client, such as Mongochef and investigate the specific collections for details.
Editing or deleting environments
Inside a specific environment dashboard optional buttons are available for deleting and editing the environment configurations:

Note: Deleting an environment does not empty the inventories of previous scan results, this can be accomplished in future scans when using the –clear options.
Event-based scanning
For dynamic discovery and real-time updates of the inventories Calipso also provides event-based scanning with event_manager application in the calipso-listen container.
Event_manager listens to the VIM AMQP BUS and based on the events updates the inventories and also kickoff automatic scanning of a specific object and its dependencies.
Enabling event-based scanning
Per environment, administrator can define the option of event-based scanning, using either UI or API to configure that parameter in the specific environment configuration:
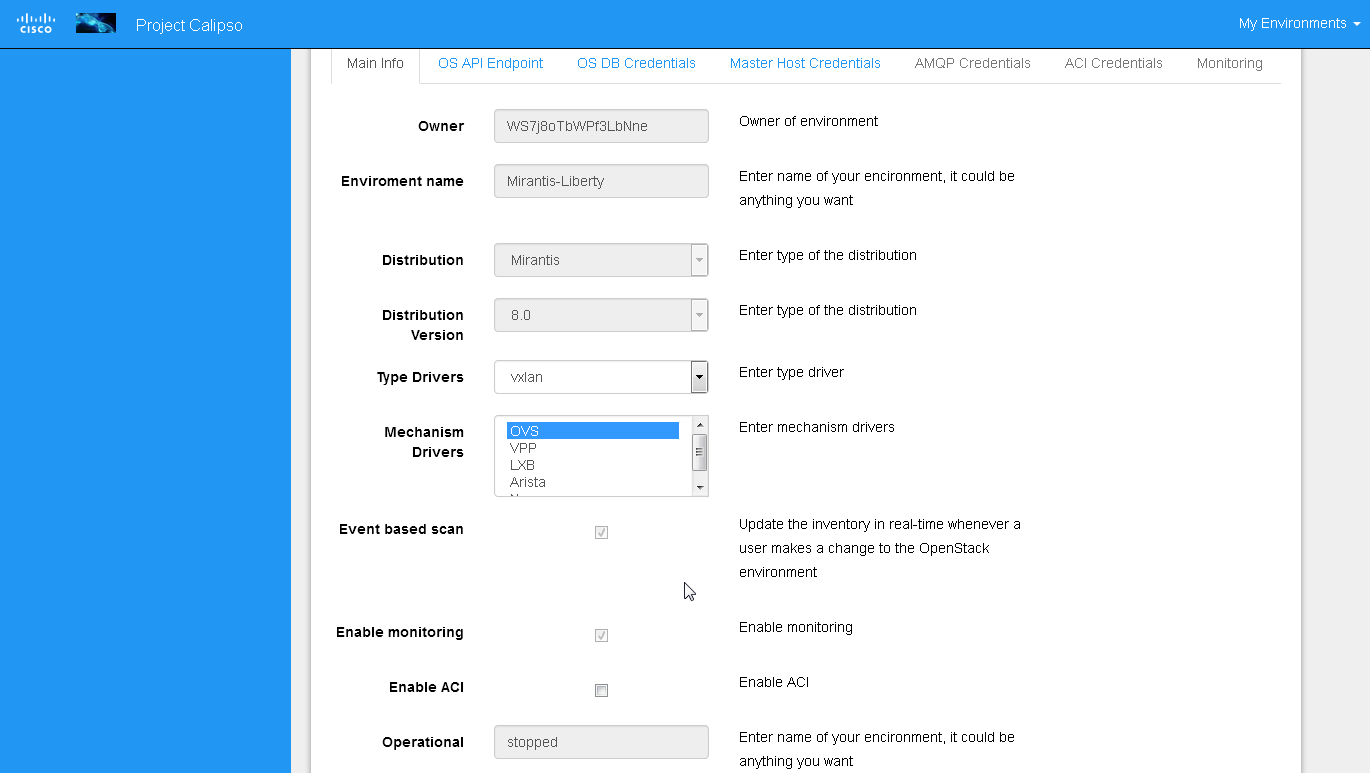
In cases where event-based scanning is not supported for a specific distribution variance the checkbox for event based scan will be grayed out. When checked, the AMQP section becomes mandatory.
This behavior is maintained through the “supported_environments” collection and explained in more details in the calipso-model document.
Event-based handling details
The event-based scanning module needs more work to adapt to the changes in any specific distribution variance, this is where we would like some community support to help us maintain data without the need for full or partial scanning through scheduling.
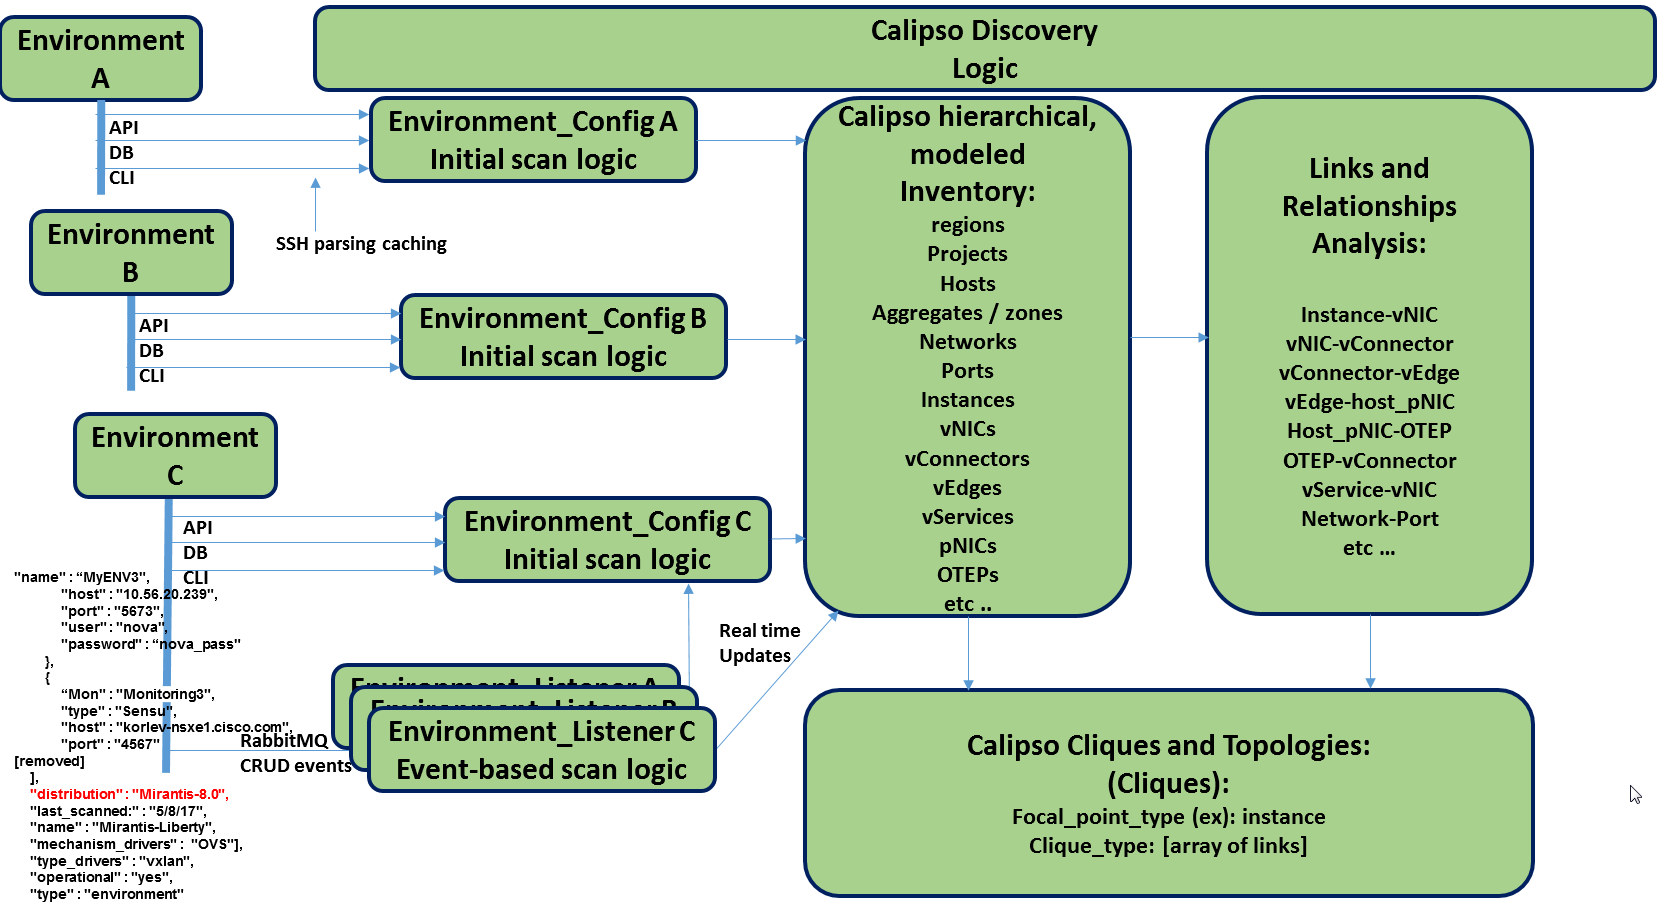
The following diagram illustrates event-based scanning module functions on top of the regular scanning module functions:
In the following tables, some of the current capabilities of event-handling and event-based scanning in Calipso are explained: (NOTE: see pdf version of this guide for better tables view)
| # | Event name | AMQP event | Handler | Workflow | Scans | Notes |
|---|---|---|---|---|---|---|
| Instance | ||||||
| 1 | Create Instance | compute.instance.create.end | EventInstanceAdd |
|
Yes {by object id: 2,
links: 1,
cliques: 1,
from queue: ?}
|
** ** |
| 2 | Update Instance | compute.instance.rebuild.end compute.instance.update |
EventInstanceUpdate |
|
Yes (if #1 is used) No (otherwise) |
The only fields that are updated: name, object_name and name_path |
| 3 | Delete Instance | compute.instance.delete.end | EventInstanceDelete (EventDeleteBase) |
|
No | delete_handler() is expanded later |
| Instance Lifecycle | ||||||
| 4 | Instance Down | compute.instance.shutdown.start compute.instance.power_off.start compute.instance.suspend.start |
Not implemented | |||
| 5 | Instance Up | compute.instance.power_on.end compute.instance.suspend.end |
Not implemented | |||
| Region | ||||||
| 6 | Add Region | servergroup.create | Not implemented | |||
| 7 | Update Region | servergroup.update servergroup.addmember |
Not implemented | ** ** | ** ** | ** ** |
| 8 | Delete Region | servergroup.delete | Not implemented | ** ** | ** ** | ** ** |
| Network | ||||||
| 9 | Add Network | network.create.end | EventNetworkAdd |
|
No | ** ** |
| 10 | Update Network | network.update.end | EventNetworkUpdate |
|
No | The only fields that are updated: name, object_name, name_path and admin_state_up |
| 11 | Delete Network | network.delete.end | EventNetworkDelete (EventDeleteBase) |
|
No | delete_handler() is expanded later |
| Subnet | ||||||
| 12 | Add Subnet | subnet.create.end | EventSubnetAdd |
|
Yes {cliques: 1} |
|
| 13 | Update Subnet | subnet.update.end | EventSubnetUpdate |
4.1. Add dhcp document 4.2. Make sure ApiAccess.regions is not empty 4.3. Add port document 4.4. If port has been added, add vnic document, add links and scan cliques.
5.1. Delete dhcp document 5.2. Delete port binding to dhcp server if exists
|
Yes {cliques: 1} (only if dhcp status has switched to True) |
|
| 14 | Delete Subnet | subnet.delete.end | EventSubnetDelete |
and remove itself from network_document[‘subnets’]
|
No | |
| Port | ||||||
| 15 | Create Port | port.create.end | EventPortAdd |
|
Yes {cliques: 1} (only if ‘compute’ is in port[‘device_owner’] and instance_root is not None (see steps 3 and 6)) |
|
| 16 | Update Port | port.update.end | EventPortUpdate |
|
No | |
| 17 | Delete Port | port.delete.end | EventPortDelete (EventDeleteBase) |
3.1. Get instance document for the port from db. If it doesn’t exist, to step 4. 3.2. Remove port from network_info of instance 3.3. If it was the last port for network in instance doc, remove network from the doc 3.4. If port’s mac_address is equal to instance_doc’s one, then fetch an instance with the same id as instance_doc using ApiFetchHostInstances fetcher. If instance exists and ‘mac_address’ not in instance, set instance_doc’s mac_address to None 3.5. Save instance_docs in db
|
No | delete_handler() is expanded later |
| Router | ||||||
| 18 | Add Router | router.create.end | EventRouterAdd |
3.1. Add router document (with network) to db 3.2. Add children documents: 3.3. If no ports folder exists for this router, create one 3.4. Add router port to db 3.5. Add vnics folder for router to db 3.6. If port was successfully added (3.4), try to add vnic document for router to db two times (??) 3.7. If port wasn’t successfully added, try adding vnics_folder again (???) (*note 1*) 3.8. If step 3.7 returned False (*Note 2*), try to add vnic_document again (??)
|
Yes {cliques: 1} |
|
| 19 | Update Router | router.update.end | EventRouterUpdate |
3.1. If router_doc has a ‘gw_port_id’ key, delete relevant port. 3.2. If router_doc has a ‘network’: 3.2.1. If a port was deleted on step 3.1, remove its ‘network_id’ from router_doc[‘network’] 3.2.2. Delete related links
4.1. Add new network id to router_doc networks 4.2. Use CliFetchHostVservice to fetch gateway port and update it in router_doc 4.3. Add children documents for router (see #18 steps 3.2-3.8) 4.4. Add relevant links
|
Yes {cliques: 1} | |
| 20 | Delete Router | router.delete.end | EventRouterDelete (EventDeleteBase) |
|
No | delete_handler() is expanded later |
| Router Interface | ||||||
| 21 | Add Router Interface | router.interface.create | EventInterfaceAdd |
6.1. If router_doc is an empty type, log an error and continue to step 7 (*Note 1*) 6.2. Add new network id to router_doc network list 6.3. If gateway port is in both router_doc and db, continue to step 6.7 6.4. Fetch router using CliFetchHostVservice, set gateway port in router_doc to the one from fetched router 6.5. Add gateway port to db 6.6. Add vnic document for router. If unsuccessful, try again after a small delay 6.7. Update router_id in db
|
Yes {cliques: 1} |
|
| 22 | Delete Router Interface | router.interface.delete | EventInterfaceDelete |
|
No | |
ACI scanning
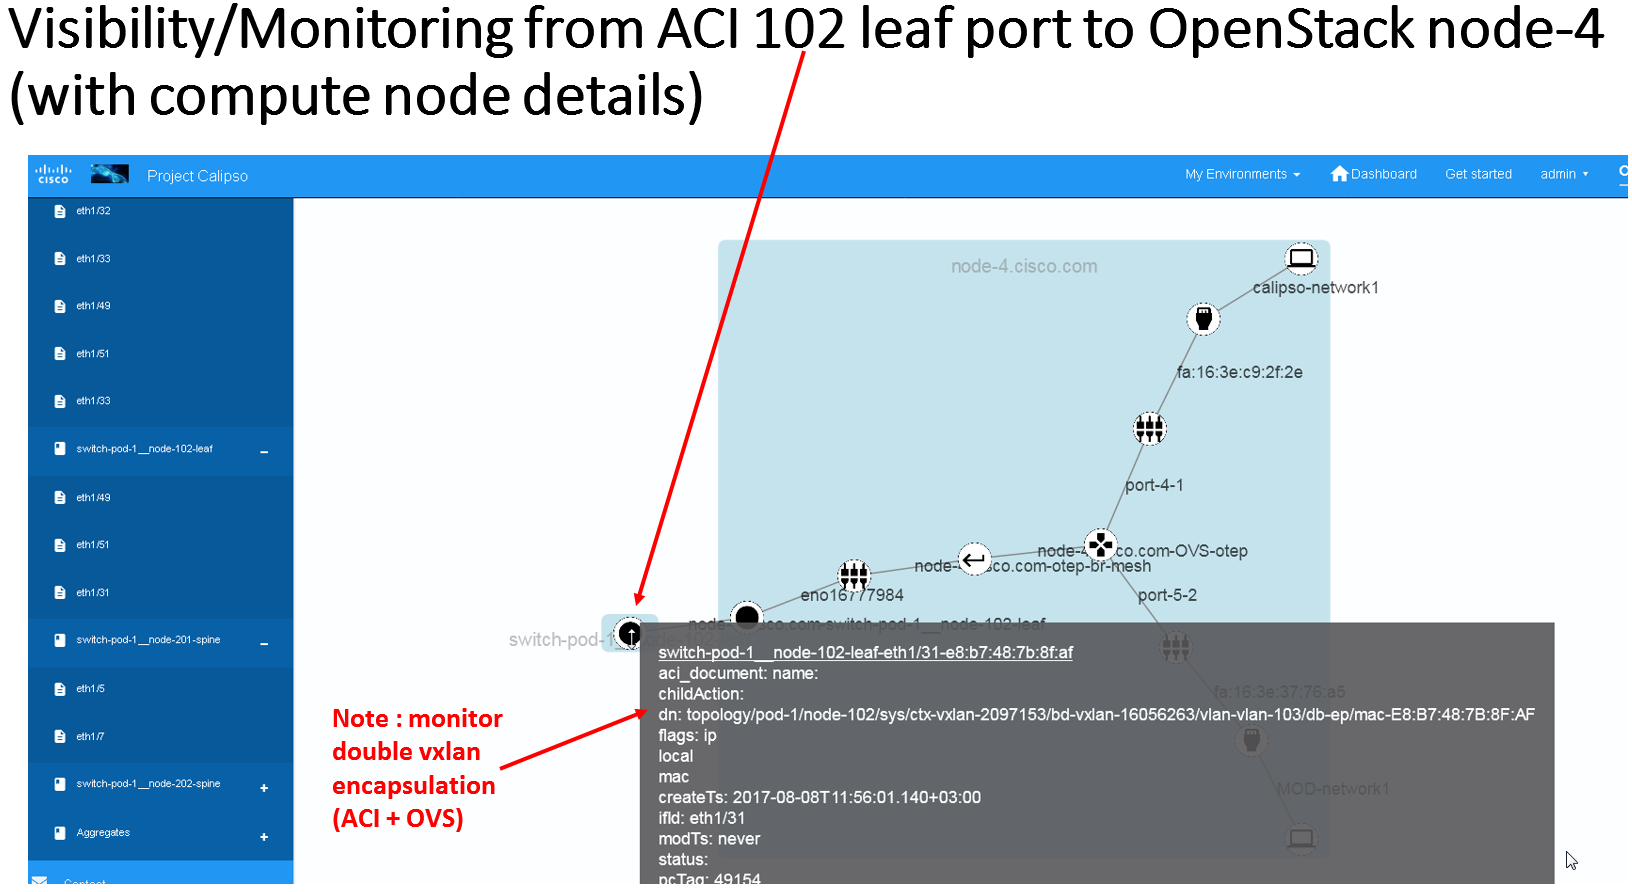
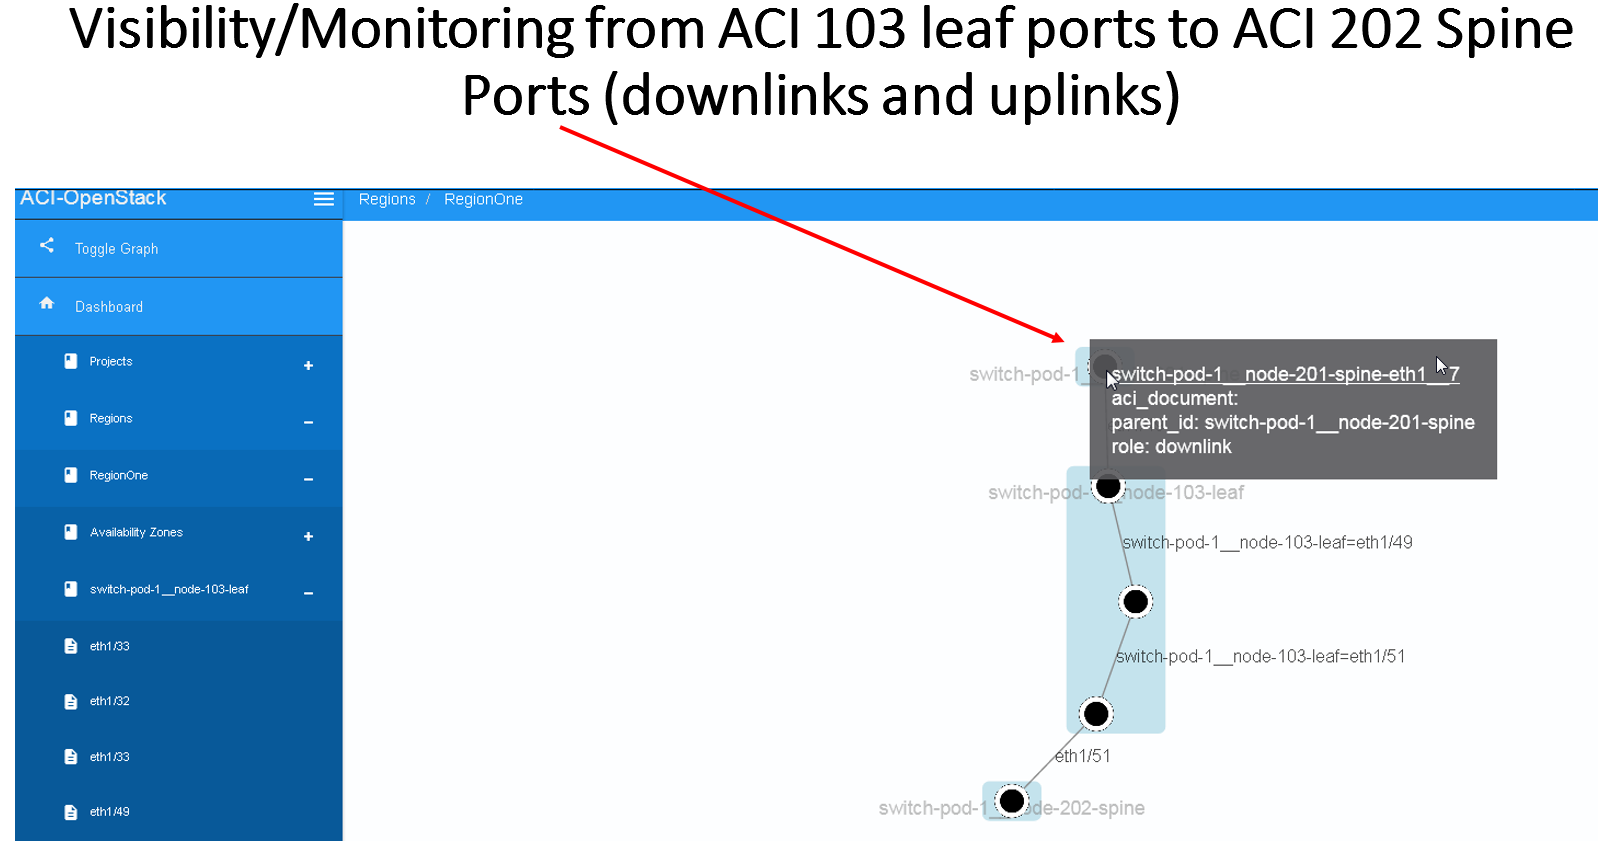
For dynamic discovery and real-time updates of physical switches and connections between physical switches ports and host ports (pNICs), Calispo provides an option to integrate with the Cisco data center switches controller called “ACI APIC”.
This is an optional parameter and once checked details on the ACI server and API credentials needs to be provided:

The results of this integration (when ACI switches are used in that specific VIM environment) are extremely valuable as it maps out and monitors virtual-to-physical connectivity across the entire data center environment, both internal and external.
Example graph generated in such environments:

Monitoring enablement
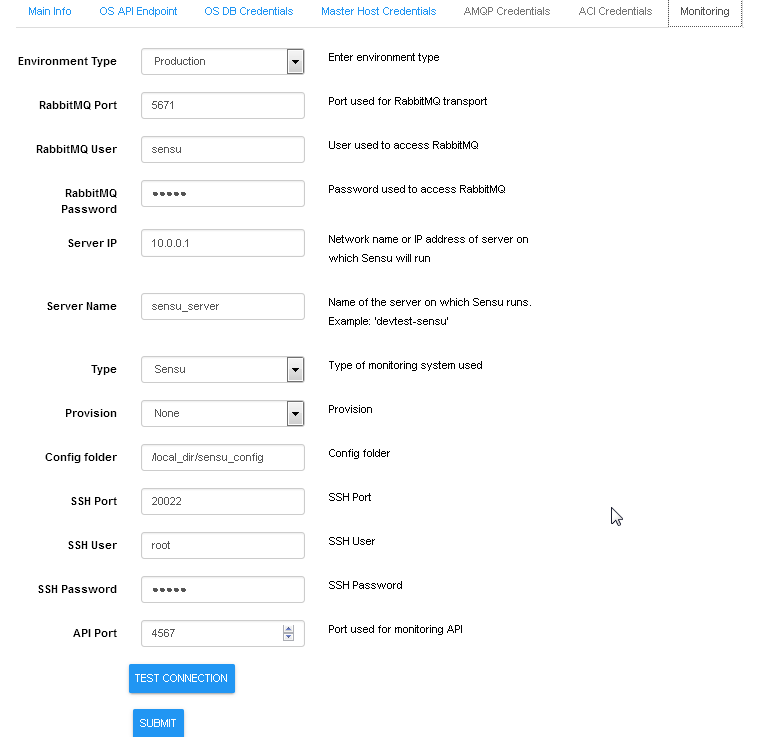
For dynamic discovery of real-time statuses and states of physical and virtual components and thier connections Calispo provides an option to automatically integrate with the Sensu framework, customized and adapted from the Calispo model and design concepts. Follow the monitoring-guide for details on this optional module.
Enabling Monitoring through UI, using environment configuration wizard:
Modules data flows
Calipso modules/containers and the VIM layers have some inter-dependencies, illustrated in the following diagram:
